
GENERAL
G0. How can I restore the application to a fresh initial state?
G1. How do I access the i41CX+ settings?
G2. Is there a user manual that describes the operation details and available functions?
G3. How do I access the back view of the calculator?
G4. How can I access the help screen that was displayed when the app was first launched?
G5. How do I access the printer screen?
G6. How do I access the keyboard overlays?
G7. The key click sounds are audible even when the calculator is powered off. Is this a bug?
G8. How do I access the ED Keyboard Map, Frequently Used Options, Flags, Registers, Usage & Examples, Quick Reference Guide, and CAS Quick Reference?
G9. Scrolling the Flags, Registers, Usage & Examples, Quick Reference Guide, and CAS Quick Reference tables to find the item of interest can be cumbersome. Is there a more efficient way to navigate the tables?
G10. I would like to share my calculations and/or programs with other i41CX+ users. How can I do that?
G11. I would like to back up my programs and data. How can I do that?
G12. I accidentally deleted the I41CX-MATH module. How can I recover it?
G13. Does i41CX+ support the iTunes File Sharing feature?
G14. The display color control sliders are disabled, the display colors changed, and the LCD font changed to "Bauhaus Smooth" when I selected an LED skin. Is this a bug?
G15. Changing the "Stack Display" global setting on the iPad has no effect. Is this a bug?
G16. I loaded an overlay and it appears distorted. Is this a bug?
G17. How do I create my own I41CXED macros?
CALCULATOR
C0. What is RPN?
C1. Is there a user manual that describes the operation details and available functions?
C2. How do I execute functions that are not on the keyboard?
C3. How do I use synthetic programming?
C4. How do I display the calculator's time module clock?
C5. What is the image on the back view of the calculator?
C6. When using the system keyboard for alphanumeric entry some keys are ignored and other keys enter different characters into the calculator. Are these bugs?
C7. I want to enter a large program into the calculator. It would be easier to do this using a text editor on my computer than on my iOS device. Is there a way to create a program file on the computer and transfer it to the calculator?
C8. How do I import modules, overlays, programs, flags, registers, text files, etc. into i41CX+?
C9. I've selected a keyboard overlay but the key functions in USER mode don't reflect the labels on the overlay. What am I doing wrong?
C10. Can I create my own keyboard overlays?
C11. The stack displays NNN. Is this a bug?
C12. I cannot enter ASTO 00 using the system keyboard. I keep getting ASTO IND 0 instead. Is this a bug?
C13. I loaded the IR-PRINT module and executing a function from another module froze the application. Is this a bug?
C14. Is there a way to view the status of all flags and registers?
C15. The values in the Flags and Registers tables are not updated in real time. Is this a bug?
C16. What is graphics mode and how do I use the graphics mode functions introduced in version 3.0?
C17. Can I operate the calculator using a Bluetooth keyboard?
CAS
CAS1. What is CAS?
CAS2. How does the i41CX+ CAS work?
CAS3. Is there a reference manual that describes the operation details and available functions?
CAS4. Is the i41CX+ CAS fully source code compatible with REDUCE?
CAS5. Can you provide some examples?
CAS6. Is there a better way to create the input to CAS than using the ED function?
CAS7. Can CAS access the calculator registers and flags? Can I modify the calculator registers using CAS?
CAS8. How can I manipulate strings and NNN data types in the CAS environment?
CAS9. Can CAS generate output in lowercase?
CAS10. My CAS output fills up extended memory. Is there a way around this?
CAS11. What version of gnuplot is the i41CX+ CAS plot engine based on?
CAS12. Is there a user manual that describes the CAS environment's plot facilities?
CAS13. Is there a tutorial for the CAS environment?
CAS14. What terminals are supported by the integrated gnuplot?
PRINTER
P1. Is there a user manual that describes the operation details and available functions?
P2. What is the maximum number of lines that can be printed on a roll?
P3. What is the "Reg [SIZE-1] Color Control" option?
GLOBAL SETTINGS
GS1. What is the "Keep Time" preference setting?
GS2. What is the "CV Calculator Mode" preference setting?
G0. How can I restore the application to a fresh initial state?
*** IMPORTANT *** Please do not follow the following procedure if you are an i41CX user that purchased the "i41CX+ Features Upgrade". Please follow the procedure described here instead.
Because i41CX+ has a persistent state, simply clearing the memory does not restore the application to the initial installation state. Moreover, because this state and other information is backed up by iTunes, deleting the application from your device also does not completely restore the application to a completely fresh initial state. If you ever run into a problem that cannot be resolved by quitting and restarting the app and/or clearing its memory, please follow the below procedure.
- Delete i41CX+ from your device.
- Delete i41CX+ from the Applications section of iTunes.
- Re-download i41CX+ from the iTunes App Store on your computer (not on your device). Note that so long as you use the same account that you used to purchase it, you won't be charged for downloading it again.
- Sync with iTunes to re-install i41CX+.
This procedure will restore i41CX+ to a fresh initial state and hence will resolve any issues that may arise from application update problems, use of incompatible modules such as described in C13, etc.
G1. How do I access the i41CX+ settings?
The i41CX+ settings are available in the built-in iOS Settings application  that is on your home screen by default. If you tap it and scroll toward the bottom you'll
see an entry called "i41CX+" that when tapped will reveal the i41CX+ settings.
that is on your home screen by default. If you tap it and scroll toward the bottom you'll
see an entry called "i41CX+" that when tapped will reveal the i41CX+ settings.
G2. Is there a user manual that describes the operation details and available functions?
A good place to start is the i41CX+ Mini-Manual. The mini-manual provides a comprehensive overview of all major features of i41CX+, including some background on the HP-41CX and tips and tricks. It is not meant to be an exhaustive and dry reference, but rather a light introduction into what is arguably the most sophisticated programmable calculator application for iOS devices.
The calculator portion of i41CX+ is functionally equivalent to the classic HP-41CX calculator and the virtual printer is functionally equivalent to the 82143A printer. Warren Furlow's The HP-41 Archive Website is a comprehensive archive of all things related to the HP-41, including internal documentation that was donated by HP. You'll find the operating manuals of the HP-41 in the Owner's Manuals section and the operating manuals of the 82143A printer in the Standard Peripherals section. PDF versions of the manuals can also be downloaded from here.
Starting with version 1.3.6, i41CX+ includes a Quick Reference Guide that lists brief descriptions of all built-in HP-41CX functions and i41CX+ specific functions (the functions included in the "I41CX" OS and hardware integration module and in the "I41CX-MATH" advanced mathematical functions module). The Quick Reference Guide can be accessed by swiping inside the orange border frame on the back view of the calculator. See G9 for more details.
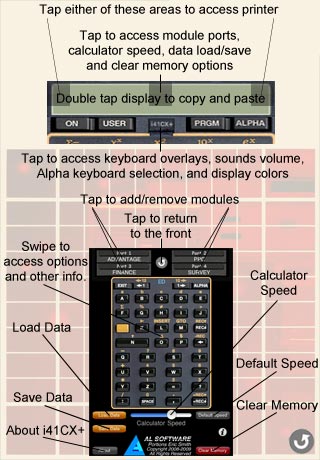
G3. How do I access the back view of the calculator?
To access the back view of the calculator, tap the center of the LCD display area, as shown in the calculator information screenshot at the top right of this page. Alternatively, a vertical swipe gesture in the LCD display area will also flip the calculator over to the back.
G4. How can I access the help screen that was displayed when the app was first launched?
The calculator help screen can be accessed from the back view of the calculator. Please access the back view as described in G3 and then tap the "i" icon.
G5. How do I access the printer screen?
The printer screen can be accessed by tapping either the left or right side of the calculator display area. tap the same areas in the printer screen to return to the calculator screen. Alternatively, a horizontal swipe gesture in the LCD display area or inactive areas of the printer screen will also switch between the calculator and printer screens.
G6. How do I access the keyboard overlays?
Tap the keyboard overlay holder clip  that is located
below the middle of the calculator display and above the keyboard area to access the
overlay/skin/LCD picker as well as the app sounds volume and display color controls.
that is located
below the middle of the calculator display and above the keyboard area to access the
overlay/skin/LCD picker as well as the app sounds volume and display color controls.
G7. The key click sounds are audible even when the calculator is powered off. Is this a bug?
No, this is actually a feature. The key click sounds are meant to emulate the tactile feedback of physical keys. As such, they are always active regardless of the powered state of the calculator. If desired, the key click sounds can be disabled either by turning the calculator sounds volume all the way down using the "Sounds Volume" slider that can be accessed by pressing the overlay holder clip (see G6 for details) or by selecting "None" for the "Key Click Sound Type" option in the global settings (see G1 for how to access the global settings).
G8. How do I access the ED Keyboard Map, Frequently Used Options, Flags, Registers, Usage & Examples, Quick Reference Guide, and CAS Quick Reference panels?
The ED Keyboard Map, Frequently Used Options, Flags, Registers, Usage & Examples, Quick Reference Guide, and CAS Quick Reference panels are accessed by swiping inside the orange frame on the back view of the calculator (see G3 for how to access the back view). The views are organized as follows, where "<-" denotes a right-to-left swipe gesture inside the orange frame: ED Keyboard <- Frequently Used Options <- Flags <- Registers <- Usage & Examples <- Quick Reference Guide <- CAS Quick Reference.
G9. Scrolling the Flags, Registers, Usage & Examples, Quick Reference Guide, and CAS Quick Reference tables
to find the item of interest can be cumbersome. Is there a more efficient way to navigate the tables?
Yes. Tapping the right edge of these tables will jump to the proportionate location in the table (e.g. tapping the middle of the right edge will jump to the middle, tapping the bottom of the right edge will jump to the bottom, etc.), similar to the way that tapping a letter in the built-in address book works. Furthermore, tapping the title area of these tables will jump back to the top of the table, similar to the way that tapping the status bar in Safari jumps back to the top of the web page.
In addition, the Usage & Examples, Quick Reference Guide, and CAS Quick Reference tables can be searched by tapping the "magnifying glass" icon at the top left of each table.
G10. Is there a way to share my calculations and/or programs with other i41CX+ users?
You can share your modules, programs, data, flags, overlays, text files, etc. with other users by emailing them. The recipient can then tap the i41CX+ icon image, shown below, in the received message in the iOS Mail app window to launch i41CX+ and save the contents of the email.

Note that items saved from an email message are stored in the i41CX+ documents directory, not loaded directly into the calculator's memory. Saved modules become available in the module port pickers, data in the "Load" picker, and overlays in the overlay/skin/LCD picker. To load a saved item into the calculator, pleas load the item using the appropriate picker. For example, if you receive a program from another user and save it, it won't show up under CAT 1 until it is loaded into the calculator's memory using the "Load" picker.
To email a program, tap the "Save" button near the bottom left corner of the back view of the calculator, scroll to the program that you wish to email, and press the Mail button. To email data registers or flags, swipe inside the orange frame of the back view of the calculator until you reach the appropriate table and then click the Mail icon at the top left of the table.
It is also possible to email items using the appropriate function such as MAILA to mail the Alpha register contents, MAILPRT to mail the printout in text format, etc. Please see the Quick Reference Guide for the available mail functions.
Alternatively, you can place the files on a web server and the recipient can download them into their copy of i41CX+ using the "Download from URL..." feature.
If you are running iOS 3.2 or later on your device, yet another alternative is to use the iTunes File Sharing feature (see G13). All i41CX+ files can be imported/exported using iTunes when the device is connected to your computer.
G11. I would like to back up my programs and data. How can I do that?
You can easily back up your programs and data on your device by saving them using the "Save" button on the back view of the calculator or by emailing yourself the program(s) and data that you wish to back up. You can also save the entire state of the calculator on your device using the "Save" button. You can restore such states later using the "Load" button.
As described in G10, items imported from an email are saved into the i41CX+ documents directory on your device, not loaded directly into the calculator's memory. Therefore, to restore backed up items into the calculator's memory, you need to load the items using the "Load" or overlay buttons.
The load/save state feature can also be used to create multiple configurations of program and data for different applications and usage scenarios.
If you are running iOS 3.2 or later on your device, another alternative to back up your data is to use the iTunes File Sharing feature (see G13) to copy the i41CX+ data onto your computer. To restore it at a later date, simply place the individual files into the i41CX+ files pane in iTunes and sync your device.
G12. I accidentally deleted the I41CX-MATH module. How can I restore it?
To restore the I41CX-MATH module without reinstalling the application, simply open this page in mobile Safari on your device and tap the "send to i41CX+" image below to import the I41CX-MATH module into i41CX+.

Alternatively, you can download the I41CX-MATH module from here and use the iTunes File Sharing feature (see G13) to reinstall it.
G13. Does i41CX+ support the iTunes File Sharing feature?
- Overlay: PNG
- Program: RAW or TXT
- Text File: TEXT
- Data File: DAT
- Module: MOD
- Registers: REG
- Flags: FLG
- HEPAX RAM: RAM
- Configuration: CFG
- State File: SAVE
- Plot: SVG
- Macro Keyboard: KBD
G14. The display color control sliders are disabled, the display colors changed, and the LCD font changed to
"Bauhaus Smooth" when I selected an LED skin. Is this a bug?
No, this is not a bug. To honor the skin designer's wishes, the display color scheme and LCD font are fixed and cannot be changed while using an LED skin. The control sliders and LCD font selection will become available if a non-LED skin is selected.
G15. Changing the "Stack Display" global setting on the iPad has no effect. Is this a bug?
No, this is not a bug. The stack display is always enabled on the iPad and cannot be disabled. The "Stack Display" global setting is only applicable for the iPhone and iPod touch where, due to the limited screen real estate, the user must choose between displaying the stack display or the system status bar. Now, because i41CX+ is a universal iPhone/iPad application, the global settings are common as iOS currently does not support separate global settings based on device types.
G16. I loaded an overlay and it appears distorted. Is this a bug?
No, this is not a bug. Overlays are optimized for specific skins and devices. You probably have an overlay that is not optimized for your selected skin. Currently, there are overlays available for the "classic" skins (Bauhaus, Classic, Gris, Noir, Skinny, and Vintage) and their variants and for the "Genuine" skin. These are all available for non-Retina (iPhone 3GS and earlier), Retina (e.g. iPhone 4 and later), and iPad devices. Overlays for the various skins and devices can be downloaded from the i41CX+ Home Page. Please see C8 for details on how to import overlays into i41CX+.
G17. How do I create my own I41CXED macros?
Macro keyboard buttons can be edited by tapping a button and holding it for approximately 1 second until the editing "bubble" is shown with the macro key contents.
The macro keyboard supports the following special macros.
- Instances of "\n" (without the surrounding quotes) in macros get automatically converted into new lines.
- Assigning "\b" (without the surrounding quotes) to a macro button turns that button into a backspace/delete key.
- Assigning "\c" (without the surrounding quotes) to a macro button turns that button into a clear key.
- Assigning "\cb" (without the surrounding quotes) to a macro button turns that button into a "clear batch output" key.
- Assigning "\r" (without the surrounding quotes) to a macro button turns that button into a "silent" return key that inserts a new line without causing CAS execution of that line.
- If the "Macro Insertion Point" setting is set to "Automatic", placing "\^" in a macro controls the placement of the cursor/karet.
The macro buttons can be optionally labelled by including the desired label surrounded by the # character in the macro text. For example, if a macro contains #LABEL#, the button will display LABEL in a larger font instead of the actual contents of the macro. Moreover, the following labels (in uppercase) are automatically displayed with the mathematical symbol for the corresponding CAS operator/constant: DF, E, I, INFINITY, INT, PI, PROD, and SUM. The default integral, derivative, pi, imaginary number, natural number, and infinity buttons are examples that utilize these features.
C0. What is RPN?
Mathematical operations are generally taught in infix notation, with the mathematical operators placed between the data that they operate on. For example, in the expression 2 + 3 = 5, the "+" operator is placed between the 2 and the 3. RPN (Reverse Polish Notation), formalized by the Polish Mathematician Jan Lukasiewicz in 1920, is a way of expressing mathematical operations in postfix notation. Using the previous example, 2 + 3 = 5 would be expressed as 2E 3+ 5, where E denotes the Enter operator. Thus, in RPN all operators follow each data item and hence the term postfix.
In the above example, the number of keystrokes is the same in both cases, four to obtain the answer 5. However, this is not always the case. RPN makes it possible to enter data and operations without having to write down the intermediate answers or use parentheses. For example, the infix notation expression (3 + 4) * 6 = 42 requires 8 keystrokes to obtain the answer. In RPN, this would be 6 keystrokes: 3E 4+ 6*. That is a saving of 2 keystrokes for this very simple calculation. For more complex calculations, RPN can save a considerable number of keystrokes. In fact, RPN is never less efficient than infix notation so, in general, it can be said that RPN is more efficient.
C1. Is there a user manual that describes the operation details and available functions?
Please see G2.
C2. How do I execute functions that are not on the keyboard?
There are two ways to execute functions that are not on the keyboard. The first is to use the "execute" (XEQ) function. For example, to obtain the absolute value of the number being displayed, press the following sequence of keys:


The other option is to use the "assign" (ASN) funtion to assign the desired function to a key
in USER mode. For example, to assign the absolute value function to the key press
the following sequence of keys:

Thereafter, in USER mode (toggled using the USER key) the key will execute the ABS
function. To clear a key assignment, simply make an empty key assignment to that key. The
function assigned to a given key can be determined by pressing and holding down the
key. If the key is held down long enough, "NULL" is displayed and the key press is
effectively cancelled.
C3. What is synthetic programming and how do I use it?
Synthetic programming is a way to perform operations that are not possible with normally available functions. They enable lower level access than is otherwise possible. Synthetic programming is too large an area to cover in a FAQ. In fact, there are entire books devoted to it. The following are good places to start to learn about synthetic programming.
The HP-41C Synthetic Programming page at the Museum of HP Calculators.
Synthetic Programming Made Easy by Keith Jarett available at The HP-41 Archive Website.
If you intend to do synthetic programming, you will probably want to download and install the PPC ROM that is available at the i41CX+ module repository. The PPC ROM manual is available here. Among other functions and utilities, the PPC ROM contains several utilities to simplify the entry and use of synthetic operations. In particular, we recommend taking a look at the LB and MK utilities.
C4. How do I display the calculator's time module clock?
Press SHIFT and then the ON key to display the calculator's clock.
C5. What is the keyboard image on the back view of the calculator?
The image on the back view of the calculator shows the functions of the keys in the calculator's built-in text editor (ED) mode. For example, in the text editor, the USER button acts as a left arrow key to move the cursor one character position to the left and SHIFT followed by USER acts as a page left key to move the cursor 12 character positions to the left. For more details about the built-in editor, please refer to the HP-41CX owner's manual (see G2).
C6. When using the system keyboard for alphanumeric entry some keys are
ignored and other keys enter different characters into the calculator. Are these bugs?
No, this is the intended behavior. The alphanumeric entry capabilities of the calculator
are limited to the characters that can be entered from the calculator's keypad whether
entry is via the calculator keypad or the system keyboard. Therefore, unsupported
characters on the system keyboard (e.g. lowercase f-z and the majority of symbols)
are ignored. In addition, because the system keyboard is not presently customizable,
characters that are not available on the system keyboard are mapped to the closest
resembling keys. The mapping of such characters is as follows.
^ → Up Arrow
£ → Sigma
~ → Not Equal
\ → Angle
Return → R/S
C7. I want to enter a large program into the calculator. It would be easier to do this using a text
editor on my computer than on my device. Is there a way to create a program file on the computer and transfer
it to the calculator?
Yes, i41CX+ supports importing programs in the same text format that it emails them.
One way is to create/edit programs on your favorite text editor on your computer and then place the file with a .TXT or .txt extension on a web server and then download it into i41CX+ using the "Download from URL..." feature. RAW format is also supported so you can also use the User-Code File Converter that is available at The Museum of HP Calculators to convert existing HP-41CX programs in various formats into a RAW file that you can then download into i41CX+.
Another alternative is to import the program from the clipboard by emailing yourself the program listing, opening the email on your device, copying the program listing, and then using the "Load" picker's "Import from clipboard..." item to save the clipboard contents as a program file.
If the email contains the program listing as an attachment, you can optionally tap the attachment and select to open it with i41CX+ which will import the program and make it available from the "Load" picker.
Yet another alternative is to use the iTunes File Sharing feature to import the program (see G13).
C8. How do I import modules, overlays, programs, flags, registers, text files, etc. into i41CX+?
i41CX+ supports several ways to import items: 1) download from a URL, 2) import from an email attachment, 3) import from the clipboard, and 4) import using the iTunes File Sharing feature.
To download a module into i41CX+, place the module (with a .MOD or .mod extension) on a web server that provides directory listings (i41CX+ parses the standard web page directory listing to extract the file names). Then, in i41CX+ touch one of the four module ports in the back view of the calculator and then use the "Download from URL..." feature and enter the URL for the module. Note that the module file name is optional. If a specific module file name is not specified, i41CX+ will download all module files that it finds in the directory listing.
If you don't have access to a web server or simply want to download standard modules, the simplest way to do so is as follows.
- Tap the center of the LCD to go to the back view of the calculator. Alternatively, on the iPad, you can tap the top of the screen to reveal the menu bar.
- Tap one of the module ports.
- Select the "Import..." item.
- Select the "Download from URL..." item.
- Enter http://www.hp41.org/mod into the URL field (or accept the pre-entered URL if you hadn't previously edited it).
- Tap the "Download" button.
- Wait ;-) ...
- Assuming that hp41.org is online (they do go down occasionally for maintenance), after the download completes you will have the vast majority of modules ever created for the HP-41 in your device, including the Advantage Pac, Financial Pac, etc. If you're curious, you can see the list of available modules by accessing the above URL with your browser (that way you will also know whether hp41.org is online at the moment).
- Now just select one of the modules to load it into the selected port, tap another empty port and repeat until you have loaded all the modules that you want.
Programs, flags, registers, text files, etc. can be downloaded similarly by tapping the "Load" button on the back view of the calculator and using the "Download from URL..." feature. i41CX+ recognizes files with .RAW/.raw and .TXT/.txt extensions as program files, files with .REG/.reg extensions as register data files, and files with .FLG/.flg extensions as flags data files.
Warren Furlow has kindly created a programs repository of all the programs available at The HP-41 Archive Website for i41CX+ users. Due to the very large number of programs that are available, we recommend that users first look at the index file and choose the program(s) to download into i41CX+.
Overlays can be downloaded similarly by tapping the overlay holder clip button with the i41CX+ logo
and using the "Download from URL..." feature. i41CX+ recognizes files with .PNG/.png extensions as overlay files.
An alternative way to import an item into i41CX+ is to email the item to yourself, tap the attached file on your iOS device's Mail app and selecting to open the attachment in i41CX+. in fact, instead of using the above "Download from URL…" scheme to import a file from a web page, you can simply navigate to the web page with mobile Safari, tap the file, and then select to open it in i41CX+.
Another alternative is to copy the item from an application (e.g. Mail) on your device, and then use the "Import from clipboard..." item in the "Load" or overlay picker to import the clipboard contents into i41CX+. You can then load the item using the appropriate picker.
If you are running iOS 3.2 or later on your device, yet another alternative is to use the iTunes File Sharing feature (see G13).
C9. I've selected a keyboard overlay but the key functions in USER mode
don't reflect the labels on the overlay. What am I doing wrong?
First of all, it is important to note that the overlays behave just like physical overlays. They do not automatically modify the functions of the keys in USER mode. In general, the USER mode key assignments must be explicitly made by the user using the ASN function. Some specialized modules can change the behavior of the keys. In fact, some modules drastically alter the behavior of the calculator itself. However, loading overlays in i41CX+ does not have such effects. The keyboard overlays are meant to help the user remember either what functions have been assigned to which keys and/or what functions keys invoke while running a program.
Now, in many cases, the top 2 rows of keys ( through  and
and  through
  ) do not
need to be assigned by the user. They generally acquire the labelled functions when running the program
associated with the overlay. This is actually a feature that is available to all programs, including user
programs, whereby pressing those keys in USER mode execute pre-defined labels in the running program.
) do not
need to be assigned by the user. They generally acquire the labelled functions when running the program
associated with the overlay. This is actually a feature that is available to all programs, including user
programs, whereby pressing those keys in USER mode execute pre-defined labels in the running program.
For example, this is the case for the Financial Decisions Pac. When the MONEY program is run and the initial "CRL?" and "END?" prompts are answered, the top row of keys acquire/invoke the functions N, I, PV, PMT, FV and the shifted functions 12x, 12/, BEGIN/END, LIST, and CLR that are listed on the "MONEY" overlay. Note, however, that the other functions such as AMORT, NPV, etc. that are labelled on the "MONEY" overlay need to be assigned by the user using either ASN or PASN.
For functions that are not acquired automatically when running a program, there are at least two ways to achieve a similar result. One way is to use the calculator's built-in PASN function. Using the PASN function, it is possible to write a program that makes the key assignments that correspond to a given overlay. Such programs could be run by the user when switching overlays. The other way is to use the HEPAX module's HSAVEK and HGETK functions. The HEPAX module HSAVEK function saves the key assignments in a file that can be later recalled using the HGETK function. See the HEPAX Module Manual Volume 1 page 42 for details. Among other places, you can view the page in question at The HP-41 Archive Website.
C10. Can I create my own keyboard overlays?
Yes. You can either use the overlays that are available for the "classic" skins (Bauhaus, Classic, Gris, Noir, Skinny, and Vintage) and their variants and for the "Genuine" skin as the starting point or download one of the available blank overlays for the "classic" skins ( Non-Retina iPhone/iPod touch devices, Retina iPhone/iPod touch devices, iPads) or for the "Genuine" skin (Non-Retina iPhone/iPod touch devices, Retina iPhone/iPod touch devices, iPads), edit it in your favorite graphics editor, save it as a 24-bit PNG with transparency with a .PNG or .png extension, and import it into i41CX+ using any of the available import methods (see C8).
C11. The stack displays NNN. Is this a bug?
No. NNN stands for Non Normalized Number and is an internal data format used by the HP-41. It is highly unlikely for the stack registers to contain a NNN but it can occur if a synthetic or MCODE program manipulates the stack register contents directly. In any case, it is harmless so there is no need for concern.
C12. I cannot enter ASTO 00 using the system keyboard. I keep getting ASTO IND 0 instead. Is this a bug?
No, this is not a bug. The system keyboard feature works by converting the system keyboard generated ASCII codes into
HP-41CX key codes. The ASCII → key code mapping is implemented for general alphanumeric text entry in the standard
ALPHA and ED text entry modes and not for control/execution purposes. Under ALPHA entry mode, the numbers 0-9 are
shifted button entries (i.e. to enter 0 you'd press  ,
otherwise you'll get a space). Thus, when the system keyboard is active, and a number key is pressed, the corresponding
shifted key code is sent to the calculator. Thus, within the context of ASTO, this becomes ASTO IND 0 because the SHIFT
is interpreted as IND.
,
otherwise you'll get a space). Thus, when the system keyboard is active, and a number key is pressed, the corresponding
shifted key code is sent to the calculator. Thus, within the context of ASTO, this becomes ASTO IND 0 because the SHIFT
is interpreted as IND.
Another example of this is the "stack" specifier for storing and recalling data to/from stack registers; you need to use "," instead of "." to get the stack specifier when using the system keyboard.
C13. I loaded the IR-PRINT module and executing a function from another module froze the application. Is this a bug?
No, this is not a bug. In general, modules that rely on special hardware (e.g. card reader, HP-IL, wand, IR print, etc.) are not compatible with i41CX+ and will cause problems if loaded onto a module port. The key thing to note is that loaded modules can be activated without the user explicitly executing functions in them. In modern computer terms, modules can include the equivalent of extensions, code that runs in the background at all times or in response to certain events. Thus, even without explicitly using a function, merely loading a module can activate code within it. The problem is compounded by the persistent state of the calculator which means that once the internal state gets corrupted even quitting the app won't restore a normal state. Please follow the procedure outlined in G0 to recover from such a situation. Therefore, please do not load modules that rely on special hardware onto any of the module ports. Having such modules in the module picker list is harmless, of course, as the picker list is just the listing of the internal module directory contents.
There is at least one exception to this rule, however, and that is the card reader module. The card reader module is "passive" in the sense that no code in it executes unless explicitly requested by the user via some function call. Thus, loading the card reader module should be harmless and can be useful because of the HP-67/HP-97 functions included in it. Of course, attempting to execute any functions in the card reader module that rely on the card reader hardware will cause problems.
C14. Is there a way to view the status of all flags and registers?
Yes, there are two ways to achieve this. One is to use the printer PRFLAGS and PRREG functions which will print out the state of all flags and registers, respectively. The other is with the Flags and Registers tables that can be accessed by swiping inside the orange frame on the back view of the calculator (see G8).
C15. The values in the Flags and Registers tables are not updated in real time. Is this a bug?
No, this is not a bug. In order to avoid "flickering" of the values (e.g. when a program is running), the values are updated only when they are out of view (i.e. outside the visible bounds of the table) and remain static while they are visible. The values are updated if/when the items go out of sight and become visible again (i.e. by scrolling the table contents). They are also updated when register and flag files are loaded.
C16. What is graphics mode and how do I use the graphics mode functions?
Graphics mode provides full control over the display (main and stack display if stack display is visible) when running programs. This enables the display of custom characters and shapes that are otherwise not possible with traditional means. In graphics mode, all individual segments of the main "LCD display" become independently controllable as are the contents of the stack displays. As shown in the diagram below, the i41CX+ main "LCD display" consists of 12 characters, each containing 17 segments, including the segments used to display the period, comma, and colon. Incidentally, it is not normally possible to display a semicolon on an HP-41 but this is just one of the new possibilities with graphics mode.

Each segment of a character corresponds to a power of 2 with the powers shown in the diagram below.
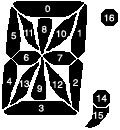
For example, a capital letter O is displayed by turning on segments 0, 1, 2, 3, 4, and 5 and turning off all other segments. Thus, setting the segments value for a character on the display to 2^0 + 2^1 + 2^2 + 2^3 + 2^4 + 2^5 = 0x3F = 63 would display the capital letter O. As another example, a semicolon could be displayed by setting the segments value of a character to 2^14 + 2^15 + 2^16 = 0x1C000 = 114688.
GSCRON enables graphics mode and GSCROFF disables graphics mode. The graphics display buffer can be cleared using the GSCRCLR function. Graphics mode uses a dedicated main display buffer that is independent from the normal display and its contents are retained until the application is quit. Therefore, clearing the graphics screen has no effect on the contents of the normal mode display. Each character's segments can be set to the desired value using the GSETSEG function which takes two arguments. The value in the X register specifies the character location (0-11) and the value in the Y register specifies the segments value for the character. The current value of the segments for a given character can be obtained using the GGETSEG function which takes the character position (0-11) argument from the X register. The stack displays (Y, Z, T, and L) can be controlled in a similar fashion. The GSETST{Y, Z, T, L} functions set the contents of the corresponding display to the contents of the Alpha register (up to a maximum of 6 characters) and GGETST{Y, Z, T, L} copies the contents of the corresponding display into the Alpha register.
Graphics mode is only available while running a program. Executing graphics mode related commands have no effect in interactive mode. The companion "turbo" program execution mode is very useful when using graphics mode as it speeds up graphics display operations.
C17. Can I operate the calculator using a Bluetooth keyboard?
Yes, i41CX+ automatically detects the presence of a Bluetooth keyboard and with the exceptions listed below, the hardware keyboard keys are mapped according to the ALPHA mode labels shown on the calculator keypad. For example, 'K' is mapped to XEQ and shifted 'K' is mapped to SHIFT XEQ (ASN). Numerical and arithmetic operator keys are mapped directly. For example, the hardware keyboard sequence "6 return 7 *" calculates the product of 6 and 7. The exceptions to these rules are listed below.
  !       		ON
  @       		USER
  #       		toggle overlay/skin/display control panel
  $       		PRGM
  %       		ALPHA
  `       		SHIFT
  tab     		R/S
  '       		VIEW/AVIEW
  return  		ENTER in normal mode, exit ALPHA in ALPHA mode
  >       		SST
  <       		BST
  {       		CLX/A
  shift N 		CAT
  shift K 		ASN in normal mode, append in ALPHA mode
  shift L 		LBL in normal mode, ASTO in ALPHA mode
  shift M 		GTO in normal mode, ARCL in ALPHA mode
  Q~Z, =, ?,
  :, space,		the SHIFT'ed functions on the labelled keys
  and comma

  (       		switch between printer and calculator views
  )       		switch between calculator and back views
  &       		toggle printer on/off
  [, ]    		switch printer mode left, right
  |       		print
  ;       		paper advance
  _       		tear paper roll
  }       		new paper roll
CAS1. What is CAS?
CAS stands for Computer Algebra System. A computer algebra system is a system that can perform symbolic mathematical manipulations. The i41CX+ CAS has the following capabilities.
Expansion and ordering of polynomials and rational functions
Substitutions and pattern matching in a wide variety of forms
Automatic and user controlled simplification of expressions
Calculations with symbolic matrices
Arbitrary precision integer, real, and complex arithmetic
Facilities for defining new functions
Analytic differentiation and integration
Factorization of polynomials
Solving a variety of algebraic equations
Facilities for the output of expressions in a variety of formats
CAS2. How does the i41CX+ CAS work?
The i41CX+ CAS function is part of the I41CX-MATH module and uses text files as mini notebooks, similar to Mathematica. CAS can be run interactively or executed as a regular HP-41 function. When run interactively, each command line is processed immediately upon tapping the return key at the end of the line. Interactive CAS execution is useful for obtaining results quickly, directly starting a CAS session with files in the device's memory without first having to create the file, debugging, reusing results of computations as subsequent input, etc. When executed as an HP-41 function, CAS performs the operations specified in the input extended memory or saved text file whose file name is specified in the Alpha register. Upon completion, the CAS output is appended to the specified output text file.
There are two ways to run CAS interactively and three ways to run CAS as an HP-41 function depending on your preference and how you wish to handle the output. These are listed below.
- Running CAS interactively
- Enter the name of a file into the Alpha register and execute I41CXED to open it. Then use a macro keyboard button configured with the special #CAS# macro to
initiate an interactive CAS session. Once an interactive CAS session is active, the #CAS# macro button can be optionally used to batch process the entire contents
of the file with CAS.
NOTE: To assign a macro to a button, simply hold down the macro keyboard button until an editing "bubble" pops up.
- Enter the name of the text file followed by two commas (e.g. "CASFILE,," without the quotes) into the Alpha register and execute the CAS function.
- Enter the name of a file into the Alpha register and execute I41CXED to open it. Then use a macro keyboard button configured with the special #CAS# macro to
initiate an interactive CAS session. Once an interactive CAS session is active, the #CAS# macro button can be optionally used to batch process the entire contents
of the file with CAS.
- Running CAS as an HP-41 function
- To use the same file for both input and output, enter the name of the text file into the Alpha register (e.g. "CASFILE" without the quotes) and execute CAS.
- To use separate input and output files, enter the input and output text file names separated by a comma into the Alpha register (e.g. "CASIN,CASOUT" without the quotes) and execute CAS.
- To ignore the CAS output, specify an empty output file name (e.g. "CASIN," without the quotes) and execute CAS. This is useful for cases where the CAS operations manipulate and place the result(s) in calculator registers (see CAS7 for details on how to access calculator registers in the CAS environment).
CAS3. Is there a reference manual that describes the operation details and available functions?
The i41CX+ CAS is based on version 3.8 of REDUCE, a system for doing scalar, vector and matrix algebra, and arbitrary precision numerical calculations. The online REDUCE User's Manual is a comprehensive and detailed reference. The same manual is also available in PDF format here. REDUCE has a extremely rich library of user contributed packages for a wide variety of applications ranging from extending REDUCE's built-in general capabilities like symbolic integration to provide new capabilities for specialized fields such as differential geometry, vector calculus, linear algebra, tensor manipulation, physics quantum operator computations, etc. The CAS environment plot facilities are based on gnuplot version 4.4.
The list of available packages in the i41CX+ CAS environment can be obtained by executing the command "lisp loadable!-packages!*;". The documentation for the bundled packages are available at the REDUCE Documentation Page, REDTEN User Manual, GRG Home Page, and DIMSYM User Manual. To use an optional package, use the "load_package" command. For example, to load the Vector Algebra package use the command "load_package avector;".
CAS4. Is the i41CX+ CAS fully source code compatible with REDUCE?
Yes. However, because the HP-41CX character set does not include curly braces ("{" and "}"), by default these are substituted by square brackets ("[" and "]") in the i41CX+ CAS for both input and output. The "{ } Handling" global i41CX+ setting can be configured to enable the use of curly braces and thereby achieve seamless compatibility between REDUCE and the i41CX+ CAS. The three available available options are as follows.
"Use [ ] instead of { }" (Default)
This option requires and uses [ ] characters instead of { } characters for all CAS input and output. This allows CAS input and output to be displayed in the calculator's built-in ED editor. Any { } characters saved, pasted, or loaded to a file in extended memory are converted to pi and right arrow characters, respectively. This effectively strictly enforces the HP-41 modified ASCII character set."Convert { } <-> [ ]"
This option converts { } characters into [ ] characters when written to a file and [ ] characters are converted back to { } characters when read back, thereby allowing for REDUCE source code compatibility while also allowing them to be readable in the calculator's built-in ED function, albeit as [ ] characters. This is a compromise between the HP-41 character set and ability to use REDUCE source code with { } characters."Use { }"
This requires and uses { } characters for CAS input and output and treats [ ] characters as separate characters thereby providing for full and complete REDUCE and gnuplot source code compatibility. Pi and right arrow characters in extended memory files are replaced by { } characters when reading/copying. { } characters in files saved/pasted to extended memory are treated as pi and right arrows in the calculator's built-in ED function. This effectively uses the standard ASCII character set and treats the HP-41 pi and right arrow characters as { } characters in I41CXED and CAS.
CAS5. Can you provide some examples?
The following are just a few simple examples to illustrate the capabilities of the CAS system. Note that these assume that the "{ } Handling" global setting is set to either "Convert { } <-> [ ]" or "Use { }".
Arbitrary precision, including complex numbers
Input:
precision 20$ 2.3^(5.6i);
Output:
-0.048079349091427726016 -0.99884351937175055583*I
Solve algebraic equations
Input:
solve(x^2+8x+15=0,x);
Output:
{x=-3,x=-5}
Solve simultaneous equations
Input:
solve({x+3y=7, y-x=1},{x,y});Output:
{{x=1,y=2}}
Differentiate a function
Input:
u:=(x*exp(i*y)*log(z))$ df(u,x,1,y,2,z,1);
Output:
     i*y
  - e
---------
    z
Integrate a function
Input:
f:=x*exp(x)$ int(f,x);
Output:
 x
e *(x-1)
Matrix operations
Input:
m:=mat((a,b),(c,d))$ det(m);
Output:
a*d - b*c
Special functions
Input:
load_package specfn$ zeta(4);
Output:
1.08232323371
The built-in "Usage & Examples" table in i41CX+ includes similar examples and can be copied for use as templates.
There are also examples for various applications/disciplines and REDUCE interactive lessons here.
CAS6. Is there a better way to create the CAS input files than using the ED function?
We recommend using the I41CXED function to create the CAS input files. I41CXED is a full-screen text editor that can be configured to use either monospace or proportional fonts of several sizes. It can also be optionally configured to use the same color scheme as the calculator display. Like the mail composition views, the I41CXED text editor view automatically rotates to match the device orientation so it is handy to view long lines in the landscape orientation.
A quick and efficient way to perform CAS operations is to use the I41CXED to pop up a text editor window, use it to write/edit the CAS input, save the text file, execute the CAS function, and use I41CXED again to view the results. The following is a short program that can be used for this purpose.
01 LBL "DOCAS"
02 SF 25		; Set flag 25 to ignore error if CAS output file does not exist
03 "CASOUT"		; CAS output file
04 PURFL		; Delete CAS output file if it exists
05 CF 25		; Clear flag 25
06 "CASIN,CASOUT"	; Specify CAS input and output files
07 I41CXED		; Open text editor (I41CXED ignores any characters after a ","
08 CAS			; Execute CAS
09 "CASOUT"		; CAS output file
10 I41CXED		; View CAS output results with text editor
11 END
Note that this program uses separate CAS input and output files and clears the CASOUT file each time is run. If you are viewing this on your device, you can tap the above icon to transfer this program to i41CX+.
CAS7. Can CAS access the calculator registers and flags? Can I modify the calculator registers using CAS?
The i41CX+ CAS environment provides complete access to the calculator registers. They can be accessed within the CAS environment using the following variables.
X: x_reg
Y: y_reg
Z: z_reg
T: t_reg
L: l_reg
A: a_reg
Rn: data_reg(n)
flag n: flag_reg(n)
Any changes made to these variables in the CAS environment are reflected in the calculator registers/flags upon completion of the CAS operations, unless the CAS script executes an "end" command, in which case CAS operations are terminated and any calculator registers/flags manipulations are discarded. It is also possible to generate an error condition in the HP-41 environment upon completion of CAS operations. This is accomplished by using the "quit_with_error" command. In this case, registers/flags changes are reflected in the HP-41 environemnt but a "CAS ERROR" is generated so that if the CAS script was run from within an HP-41 program, the program can detect an error condition and inspect the registers/flags to determine the cause and/or recover from the error condition.
CAS8. How can I manipulate strings and NNN data types in the CAS environment?
To maintain data typing intact between the calculator internal registers and the CAS environment, strings in the calculator register variables in the CAS environment include surrounding quotes as part of the string (e.g. if a register contains the string ABC the corresponding variable in the CAS environment will contain "ABC" instead of just ABC) and non-normalized numbers (NNN) are treated as strings (e.g. if a register contains 0xaabbccddeeff, the corresponding variable contains "0xaabbccddeeff"). Thus, to write a string to a calculator register in the CAS environment, include the surrounding double quotes as part of the string. For example, to write the string FOO, assign the corresponding variable in the CAS environment with """FOO""" (the quote character is assigned as a string using two quotes in the CAS environment) so that the CAS variable contains the string "FOO" including the quotes. To assign a NNN to a calculator register in the CAS environment, assign it as a string (e.g. to write 0x77665544332211 into a register, assign the corresponding variable in the CAS environment with "0x77665544332211").
CAS9. Can CAS generate output in lowercase?
Yes. By default, the CAS output is converted into uppercase letters to allow it to be viewed in the i41CX+ calculator display (using ED, for example). The conversion to uppercase can be disabled by setting flag 13 or by enabling the "Lowercase" option in the global settings. In either case, the CAS output is best viewed using the new I41CXED text editor function or emailed using the MAILTXT function since the vast majority of cases will involve long output strings and in many cases spanning multiple lines that are difficult to view using the 12 character calculator display. Both I41CXED and the mail composition windows support landscape orientation which can be more convenient for viewing long output lines.
CAS10. My CAS output fills up extended memory. Is there a way around this?
Using "$" instead of ";" to terminate lines/commands suppresses the output thereby reducing the size of the CAS output. Thus, doing all intermediate CAS operations with "$" and using ";" only for generating the output that you want to see in the CAS output file will reduce the output file size.
Another option is to operate strictly on the calculator register variables in the CAS environment. Recall from CAS7 that the HP-41CX registers can be accessed in the CAS environment using special variables. Thus, if you write your CAS operations to manipulate and place the results in the calculator variables then you can optionally bypass generating a CAS output file by specifying "CASIN," (i.e. empty output file) for the CAS input and output files. That will allow you to devote all the extended memory toward your CAS input file and the output will just show up in the calculator registers when CAS is done.
Finally, the last option is to use saved text files for the CAS input and/or output. If a specified file is not found in extended memory, CAS automatically looks for the specified file in the saved text files directory of your device (i.e. the items that show up in the "Load" picker). Thus, you can import a large CAS input file using one of the supported methods (see C8) and/or specify the name of a saved output file. Setting the "Create New Files In" i41CX+ setting to "Saved Files Directory" is a simple way to direct large CAS output directly to the saved text files directory and thus bypass the extended memory size constraints.
Saved text files can also be similarly edited/viewed using the I41CXED text editor function. I41CXED first looks for the specified file in extended memory and if it does not find it, it next looks in the saved files directory. If the file does not exist in either location, I41CXED creates the file in the location specified by the "Create New Files In" i41CX+ setting.
CAS11. What version of gnuplot is the i41CX+ CAS plot engine based on?
The i41CX+ CAS plot engine is based on gnuplot version 4.4.
CAS12. Is there a user manual that describes the CAS environment's plot facilities?
REDUCE provides a simplified interface to gnuplot via the plot() command of the gnuplot package. In addition to the plot() command, the gnuplot package provides direct access to gnuplot commands using the gnuplot() command. For details on gnuplot commands and options, please see the gnuplot User Manual.
CAS13. Is there a tutorial for the CAS environment?
Yes, you will find a detailed tutorial here.
CAS14. What terminals are supported by the integrated gnuplot?
The i41CX+ CAS environment's gnuplot engine is hard coded to use the SVG terminal type.
P1. Is there a user manual that describes the operation details and available functions?
Please see G2.
P2. What is the maximum number of lines that can be printed on a roll?
There is no explicit limit on the number of lines that can be printed on a roll. However, as a practical matter, each printed line consumes memory and if you plan to save the printout as a JPEG photo to transfer it to your computer for physical printing or manipulation then we recommend that you keep the number of printed lines to not much more than 200 lines. Moreover, because the printed lines are saved each time the app is closed and restored when the app is next launched, it would be best to keep the number of printed lines to a reasonable number to prevent excessively long app launch times when launching the app. This, of course, does not apply when resuming operation of the app from the background on devices running iOS 4 or later. It does however apply when first launching the app after a device reboot or if the app was forcibly quit while in the background either manually by the user or by the OS under low system memory conditions.
P3. What is the "Reg [SIZE-1] Color Control" option?
In addition to the ability to select the print color via the GUI RGBA sliders, i41CX+ provides for a programmatic way to control the print color. When enabled, the highest data register (hence SIZE-1) controls the print color. The encoding is 0xRGBA where R, G, B, and A each denote a byte. For example, assuming that SIZE=100 (tip: use the SIZE? function to find out the number of data registers), doing a STO 0xFF0000FF into R99 would cause subsequent printouts to be in red. This effectively enables programmatic color control and is very useful to control the colors of plots, graphs, etc. in your own functions.
GS1. What is the "Keep Time" preference setting?
This option determines whether the i41CX+ will "maintain" time while it is not running. When used in conjunction with the device time synchronization disabled, it effectively allows the calculator to keep a separate time from the device's system clock. Note, however, that alarms will not be triggered unless the calculator is running because third-party application background processes are not allowed on iOS devices. If both "Synchronize Time" and "Keep Time" are disabled the i41CX+ clock will start out at midnight 1/1/1900 every time it is launched.
GS2. What is the "CV Calculator Mode" preference setting?
If you don't know what this means then you probably don't need to use it ;-) . By default, i41CX+ is functionally equivalent to the HP-41CX. With this option enabled, i41CX+ will behave as an HP-41CV. This can be useful because there are some rare conflicts between certain modules and the HP-41CX. The original Forth module is one such example. Normal users will likely never run into any problems so we recommend leaving this setting off.